Creating own image of soa suite on eucalyptus
This is the second segment in blog series on installation of Oracle SOA Suite for eucalyptus private cloud. The main segements are:
- Installing SOA Suite on a pristine premade Linux image
- Create new image based on own installation so that others can easily set up their own test environments
- Using the newly created image for new instances
This blog posts records all the steps that I went through to make own image on eucalyptus after a successful soa suite install that was covered in previous posts.
After finalizing the installation, we would like to avoid losing all work whenever the internal cloud is booted next time.
There are really two schools of thought about creating new images:
- Own image. Either create a new image from scratch (instructions too obscure for me) or upgrade and install on top of an existing image and save that as a new image with a new name
- Install on the fly. Take an existing image and programmatically install whatever you need on top of it every time a new image is installed. This is typically totally automated with a script (puppet and chef are common open source solutions for automating this)
The second approach is much more refined but it also requires quite a lot more work and experience with the environment. It certainly is doable but installing SOA Suite is not really my day job so it’ll have to wait for another day or another blogger.
The image creation from an existing, running image is the approach I selected and it is done with euca tools.
For public material on the euca tools you can take a look at these links:
http://open.eucalyptus.com/participate/wiki/creating-image-existing-vm-centos
http://open.eucalyptus.com/participate/wiki/bundling-images
Here are the steps for creating the image that I used.
Download credentials from eucalyptus environement
First you need to download credentials. This is done via the eucalyptus cloud console.
First logon to eucalyptus cloud control, your admin should have told you what your username and password is.

The place where you download the credentials was somewhat
hard to find out, as you will not find it under keys or certificates selection
on the GUI.
Note: the naming conventions in eucalyptus are fairly confusing. Instructions talks about downloading credentials. On the user interface you have keys and certificates. It’s not clear which is which. I assumed I need to download keys (certificates being used for setting up SSL and keys being for authenticating users). Neither had a mechanism for downloading any files.
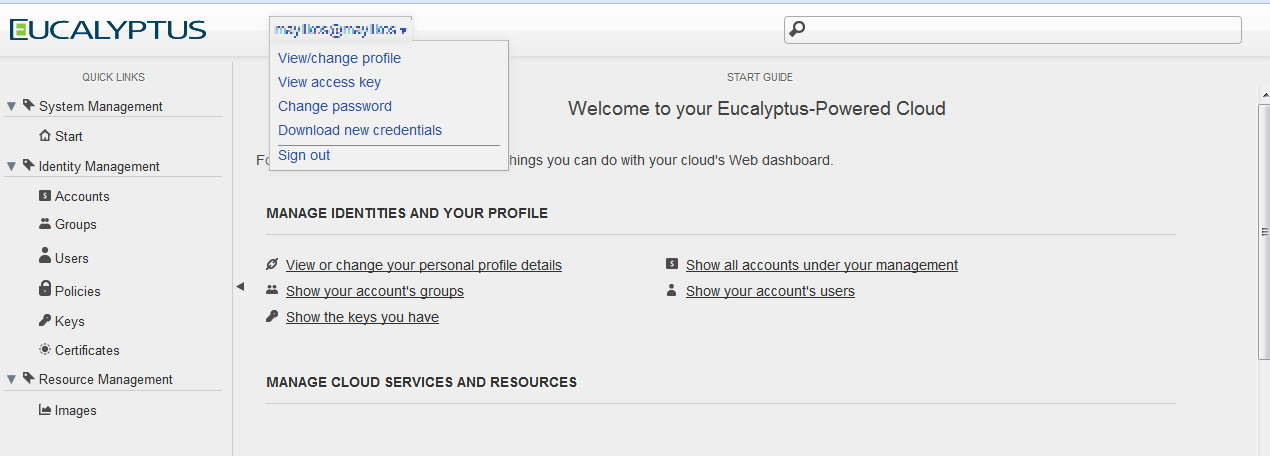
On the net there have been different types of snapshots of the cloud gui so your environment might look different (this is most likely due to a versio difference). I finally found the right place which is a drop down list from the account name at the top of the screen as shown below. Here you can download credentials.
Next the credentials file, which is name euca-<your account name>-x509.zip needs to be uploaded to the cloud instance (our newly created SOA Suite machine). You need to be root while you upload.
The zip file contains a number of files but no subdirectories so it is good to create a subdirectory called euca, move the credentials zip there and unpact it with a command like:
Unzip euca-<your account name>-x509.zip
And source eucarc command on the command line:
# source eucarc
This scrip will set a number of eucalyptus environment variables so that the subsequent eucalyptus commands will execute successfully.
Since this image was made from an existing image, there were a number of steps that I did not need to do like downloading euca-tools etc.
Euca-bundle-vol command
First step is to create the image to use as basis for new images. This is done with euca-bundle-vol command. euca-bundle-vol command uses quite a bit of disk space as playground -the recommendation is to use three times as much disk space as the source disks contain.
I create (create, attach, mount etc.) another volume as a playing ground for image creation.
The euca-bundle-vol command has a limit of 10 G for creating a new image.
If you have followed the blog posts, you know that I have volumes: the volumes that came with the orginal image and two additional one – one where I have installed oracle EE 11g and the SOA Suite mounted as /u01 and another one where the database files reside mounted as /u01. In addition there is one volume where the is the swap space. It seemed I could not make a simple single image for starting new SOA Suite instances.
The best I could do, would be to create a startable image of 10G and create snapshots of the other volumes /u01 and /u02.
This means that when I start new images, I would first start a new instance, then create new volumes based on the snapshots (of the 20 and 5 G volumes), attach the new volumes to the running instance and finally manually mount them to their original locations.
After that I would still create additional swap space as needed. A rather cumbersome process, but it would still last minutes compared to the installation exercise that took most of the day.
There was another option also. The euca tools are actually python scripts and the 10G size limit is encoded in the scripts. I later found a friend that was able to edit the python scripts and remove the 10G limit so at the end of image creation I also created additional single image to try out (it turned out later that the single image would not start so the more cumbersome process was the only fail-proof way). If you feel adventurous you can find the right script where the 10G limit is by searching - cd /usr/bin;: find . | xargs grep "Image Size is too large". This will pinpoint the right python scrip file.
However first lets go through the process of doing it the more complicated way, that requires no fiddling with the system:
As I had about 10Gigs on the original disk, I first created a new volume of 30 G, attached it to the image as /dev/vde
On hybridfox I created a new volume (from volumes and snapshots tab)
And attached it to the running image
When the disk was attached (I waited on hybridfox GUI until operation was completed by pressing refresh from time to time), I switched to the image, partitioned it and made a file system on it with command:
#fdisk /dev/vde
#mkfs –t ext3 /dev/vde1
Created a directory as the mount point (/icreate was my choice as /mnt and /ebs were already taken – these were used in the internal and public examples)
And then mounted it with
Mount /dev/vde /icreate
The actual euca-bundle-vol command I used was:
[root@soaserver euca]# euca-bundle-vol -c ${EC2_CERT} -k ${EC2_PRIVATE_KEY} -u ${EC2_USER_ID} --ec2cert ${EUCALYPTUS_CERT} --no-inherit --kernel eki-BE153962 --ramdisk eri-FDE2392E -d /icreate -r x86_64 -p rhel54soasuite.img -s 10240 –e /u01,/u02
Notes:The source eucarc command we issued earlier has set some environment variable like EC2_PRIVATE_KEY etc. that are used by this comand, the -e attribute is for exluding the external volumes /u01 and u02. the -p command is the name for the image you want to use.
For the image snapshots, I opened the volumes and snapshots tab on hybridfox, pressed the right mouse button over the volumes and selected: “create a new snapshot from this volume”
(once my friend had removed the limit, I removed the temporary volume, created another one of 75 G and mounted it to the same place /icreate with the same commands and run the following command: note that the –e part is removed which means that I no longer exlude the /u01 and /u02 mount points)
[root@soaserver euca]# euca-bundle-vol -c ${EC2_CERT} -k ${EC2_PRIVATE_KEY} -u ${EC2_USER_ID} --ec2cert ${EUCALYPTUS_CERT} --no-inherit --kernel eki-BE153962 --ramdisk eri-FDE2392E -d /icreate -r x86_64 -p rhel54soasuite.img -s 36000
This created the image into the /icreate directory
Upload the bundle to the eucalyptus cloud environment from you local disk
Upload the euca bundle with command:
[root@soaserver ~]# euca-upload-bundle -b rhel54soasuite_full -m/icreate/rhel54soasuite.img.manifest.xml

Register it on the eucalyptus environment
And as last command register your image so that it becomes visible and available.
I did this with command:
#euca-register rhel54soasuite_full/rhel54soasuite.img.manifest.xml
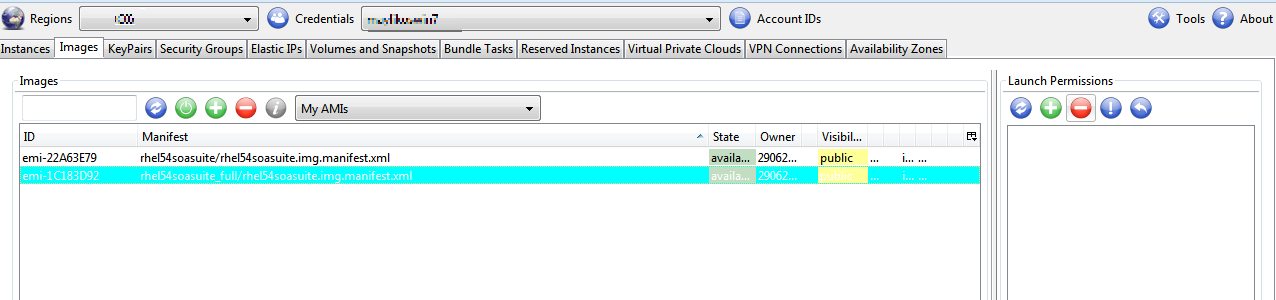
After which the image is available on the list of images:
As the last thing, unmount the no longer needed disk and detach it with:
#umount /icreate
And go to hybrid fox and detach and delete the volume you created